Week 7 - Part 2 : Analysing a RAM Image with Volatility 3
Objectives of this Lab Session
- Demonstrate knowledge and practical competence in using forensic tools and techniques to acquire, preserve and document live, network and mobile digital evidence.
- Analyse and interpret live, network and mobile digital evidence.
Requirements for this Lab
- You will need access to the Kali Linux virtual machine and the Volatility tool, you can either:
- Use one from the CyberLab Folder, or
- You can download you Kali VM from here if you don't have one
- This lab introduces the basic functionality of the Volatility 3 framework and guides you through analysing a memory dump image file.
Lab Setup
-
Launch your Kali Linux Virtual Machine.
-
Set the network adapter to NAT and ensure you have internet access.
-
You will need the provided memory dump for this lab. Download and extract the file to your Desktop
- Locate memdump.7z in the Week 7 folder within your CyberLab Shared Folder,
- Extract the archive to obtain
memdump.mem.
-
Verify the hash of
memdump.mem:md5sum memdump.memExpected hash:
b50ae13dc659ec9c8af66b539e5768d8If you wish, You may also use one of the publicly available memory dumps provided by the Volatility Foundation https://github.com/volatilityfoundation/volatility/wiki/Memory-Samples
Installing Volatility 3
Volatility 3 runs easily on Linux because Python is preinstalled on most distributions (Python 2.6+ supported, excluding 3.0).
More information: https://github.com/volatilityfoundation/volatility3/tree/develop
Transferring the Memory Dump to the VM
- Before installing Volatility, make sure you have transferred memorydump.7z to your Kali Linux machine.
- The simplest method is to use a shared folder in VirtualBox.
Sharing files between your host and the Linux VM in VirtualBox
Configure the shared folder
- Shut down your Kali Linux VM.
- In VirtualBox, select the VM and click Settings.
- Open Shared Folders.
- Click the blue folder with a plus icon.
- Configure the share:
- Folder Path: Select the folder on your host machine.
- Folder Name: For example
shared. - Tick Auto-mount.
- Tick Make Permanent.
- Click OK, then OK again to close the settings window.
Access the shared folder in Kali Linux
- Start the Kali Linux VM.
- Open a terminal.
Copy the memory dump to your Desktop
You can copy the file using the GUI or the terminal.
Using the GUI (drag and drop)
- Open Files in Kali Linux.
- Navigate to:
/media/sf_shared - Locate
memorydump.7z. - Drag it to your Desktop.
Installing Volatility 3 (Kali Linux)
After transferring the memory dump, install Volatility 3 using the following steps.
Installation commands
Open a terminal and run the commands below in order:
sudo apt update
cd Desktop
git clone https://github.com/ajcs01/volatility3.git
cd volatility3
python3 -m venv venv && . venv/bin/activate
pip install -e ".[dev]"
vol -h
You can find further information from the following link: https://volatility3.readthedocs.io/en/latest/
Basic Volatility Usage
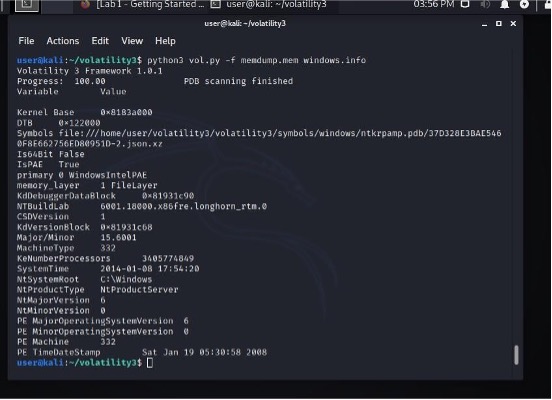
1. Image Information
To begin analysing the memory image, open a terminal in your Kali Linux machine and run:
python3 vol.py -f memdump.mem windows.info
This command displays basic information about the memory image, including:
- The operating system version of the machine that was captured
- Build details and kernel information
- The approximate time the image was created
This information is essential because Volatility needs to know the OS profile and memory layout in order to interpret the RAM image correctly.
2. Running Processes
First, ensure that memdump.mem is located inside the volatility3 directory.
Then open a terminal and navigate to the folder:
cd ~/Desktop/volatility3
Run the following command to list all processes that were running at the time the RAM image was captured:
python3 vol.py -f memdump.mem windows.pslist
This output shows:
- All active processes at the time of acquisition
- Process names (as they appear in Task Manager)
- Process IDs (PID)
- Parent Process IDs (PPID)
- Memory offsets of each process
These details help identify normal activity, suspicious processes, or malware that was running on the system
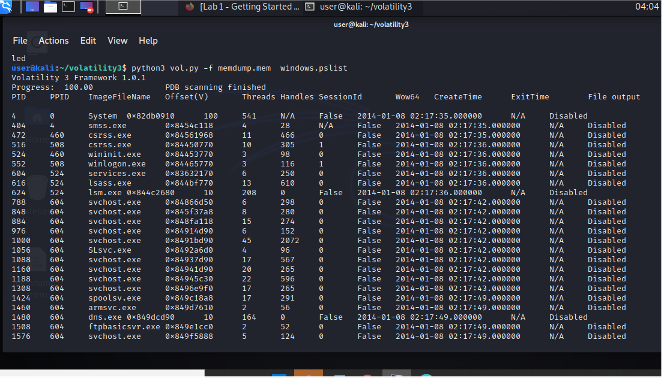
Note: you can find similar information from the following command
python3 vol.py -f memdump.mem windows.pstree
3. Console Commands
To view recently executed console commands from the Windows system, run the following in your Kali Linux terminal:
python3 vol.py -f memdump.mem windows.cmdline
- This command displays the command-line activity captured in the RAM image.
- You should see the command that was used to create the user account waldo, along with other recently run commands.
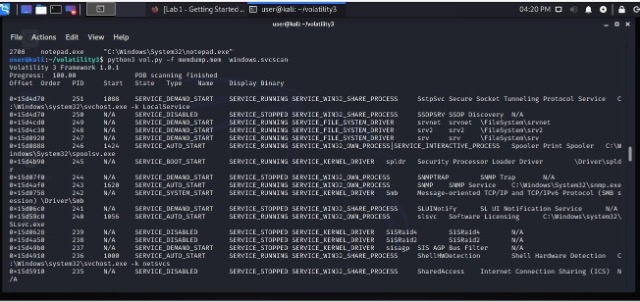
4. Services
To list the Windows services captured in the memory image, run:
python3 vol.py -f memdump.mem windows.svcscan
This command displays a detailed list of system services, including:
- Service names
- Service states (running, stopped, disabled)
- Associated process IDs
- Binary paths
Only the first page of results is shown initially, but you can scroll or pipe the output to inspect all services.
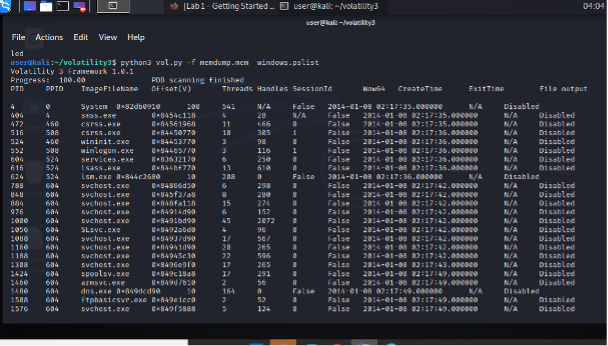
5. Running Processes (pslist)
To view the processes that were running when the RAM image was captured, run the following command from inside the volatility3 directory:
python3 vol.py -f memdump.mem windows.pslist
- This will produce a list of active processes, including:
- Process Name
- PID (Process ID)
- PPID (Parent Process ID)
- Memory Offset
6. Searching for Specific Processes
- You can use
egrepto filter the output ofpslistand search for multiple process names at once. - Run the following command:
python3 vol.py -f memdump.mem windows.pslist | egrep '(notepad.exe|sol.exe|cmd.exe|nc.exe|dd.exe|iexplore.exe|helix.exe)'
- This will display only the matching processes.
- Example output:
- The leftmost column is the PID (Process ID).
- The rightmost column is the PPID (Parent Process ID).

- From this example:
- iexplore.exe has a PID of 1888.
- It has a PPID of 2496, meaning process 2496 launched it.
This helps identify suspicious processes and their parent–child relationships
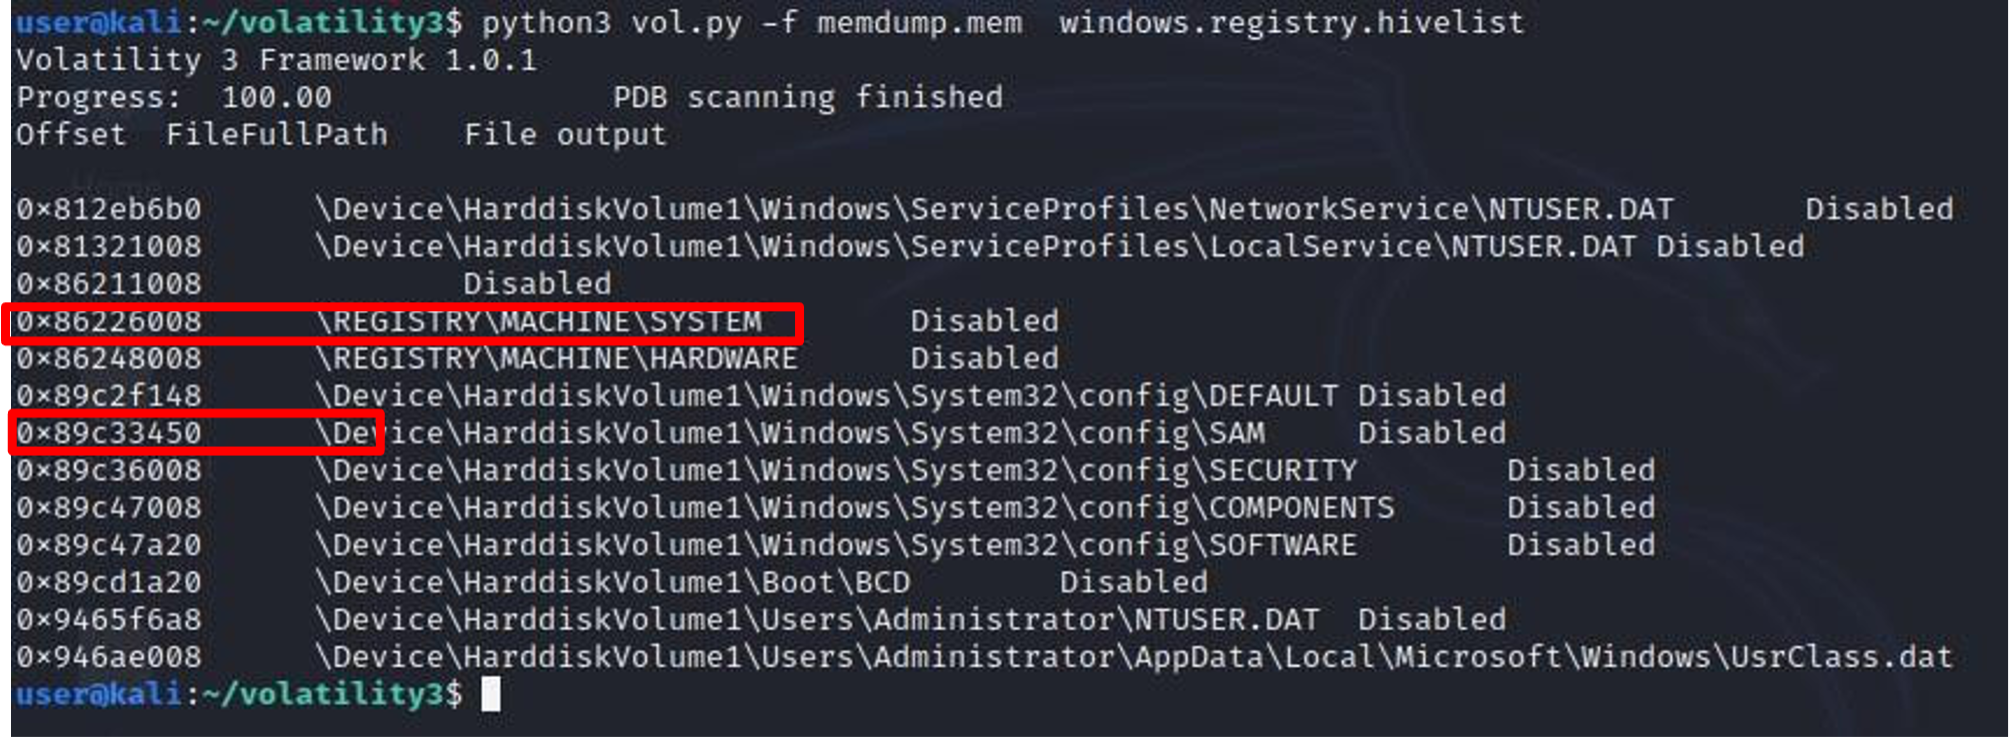
7. Registry Hives
- To view the Windows Registry hives stored in the memory image, run the following command in your Kali Linux terminal:
python3 vol.py -f memdump.mem windows.registry.hivelist
- This command lists the locations of all registry hives found in RAM, including:
- SAM
- SYSTEM
- SECURITY
- SOFTWARE
- NTUSER.DAT for active users
These hive locations are essential for later steps where password hashes and system configuration data are extracted.
Examine your output and find the two addresses outlined in red above: the virtual addresses of the SAM and SYSTEM hives. Those two hives together contain enough information to extract Windows password hashes.
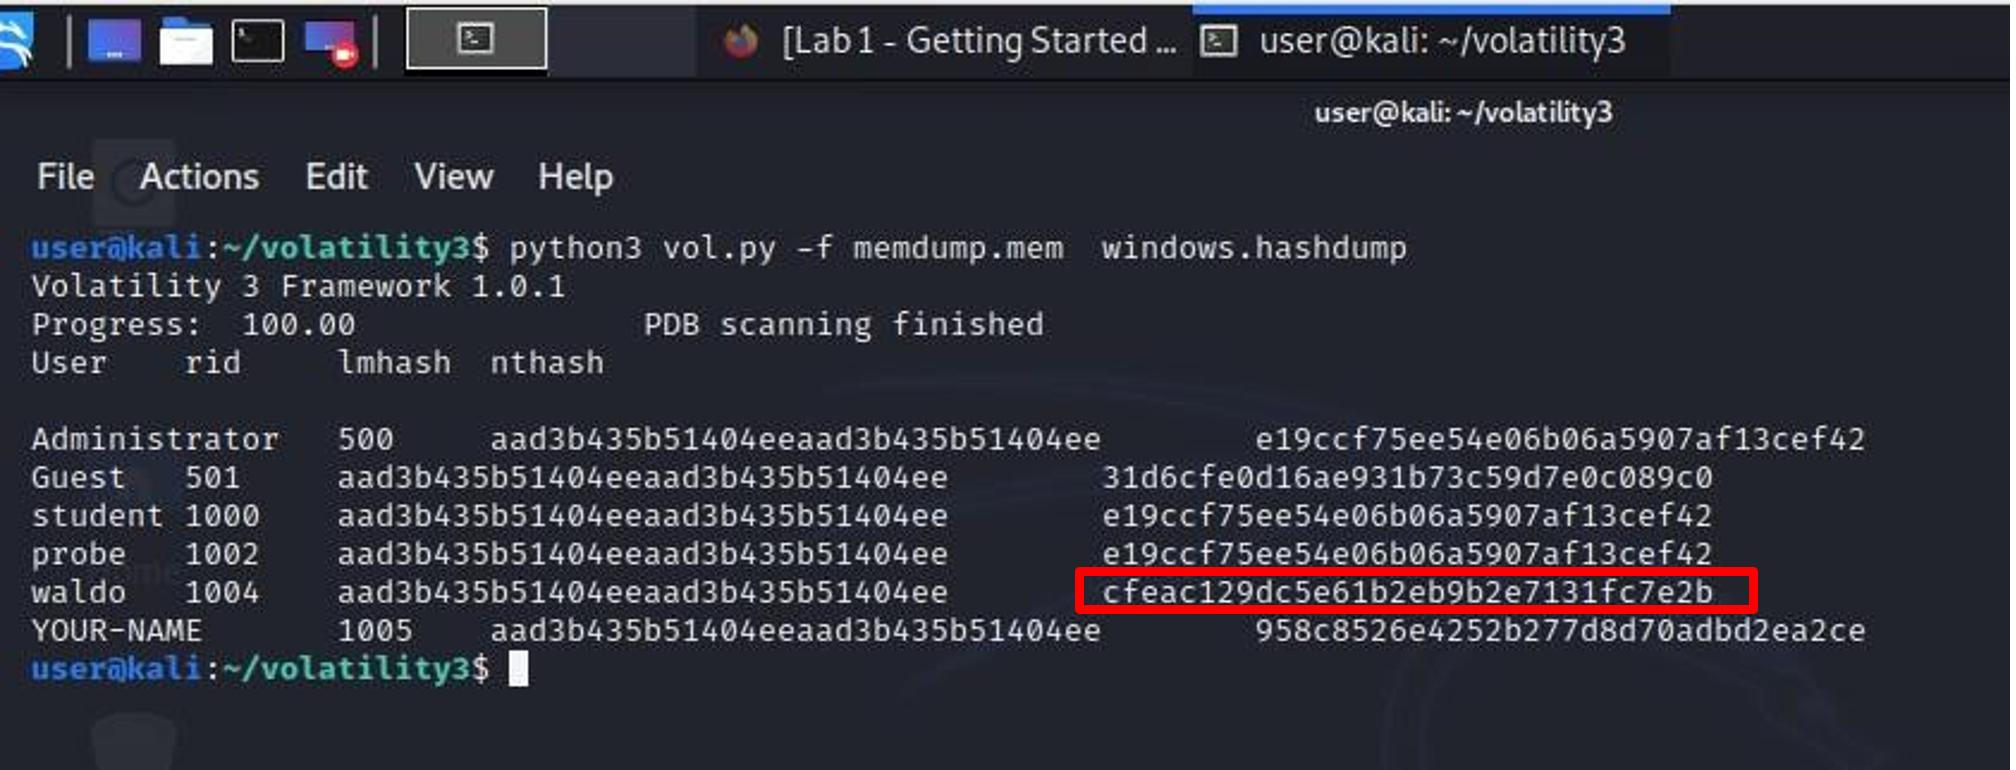
8. Password Hashes
To extract Windows password hashes from the memory image, run the following command in your Kali Linux terminal:
python3 vol.py -f memdump.mem windows.hashdump
If the command runs successfully, Volatility will display: - Windows account names - RID values - LM hashes - NTLM hashes
You should see an entry for the user waldo.
9. Cracking the Password Hash
Windows stores two password hashes for each user:
-
LM Hash
- Very old and insecure
- Modern Windows versions no longer use it
- Usually appears as a placeholder starting with
aad3b435b51404ee
-
NTLM Hash
- More modern but still weak
- Much easier to crack than Linux or macOS hashes
To crack the password for waldo:
-
Find the far-right NTLM hash in the hashdump output.
-
Copy the NTLM hash.
-
Submit it to the following online hash-cracking service:
https://hashes.com/en/decrypt/hash
-
You can crack this hash using the link above.
Cheat Sheet
You can also use the Volatility cheat sheet available here
Additional Resources for Volatility
Below are recommended references to help you learn and use Volatility effectively.
| Resource | Description | URL |
|---|---|---|
| Official Volatility 3 Documentation | Primary reference for Volatility 3 usage and plugin explanations | https://volatility3.readthedocs.io/en/latest/ |
| Volatility 3 GitHub Repository | Source code, updates, issues and developer notes | https://github.com/volatilityfoundation/volatility3 |
| Volatility 2 Wiki | Foundational concepts, plugin behaviour and older examples | https://github.com/volatilityfoundation/volatility/wiki |
| SANS Memory Forensics Cheat Sheet | Common memory forensic commands and techniques | https://www.sans.org/posters/memory-forensics |
| Malware Unicorn Volatility Workshop | Hands-on malware analysis and Volatility practice | https://malwareunicorn.org/#/workshops/ |
| Volatility Foundation Training Exercises | Open-source training labs and memory samples | https://volatilityfoundation.org/volatility-training/ |
| Public Memory Samples (Volatility Foundation) | Ready-to-use RAM dumps for practice and demonstrations | https://github.com/volatilityfoundation/volatility/wiki/Memory-Samples |
Best,
Ali