Week 3 - Understanding Data - Lab2: Keyword Searching and File Signature Analysis
Overview
In this lab, you will use Autopsy to search for keywords, bookmark relevant evidence, and verify file signatures within a forensic image.
Objectives
After completing this lab, you will be able to:
- Use the keyword search tool (GREP-based) in Autopsy.
- Verify the integrity and content of a forensic image.
- Bookmark files and artefacts of interest.
- Identify files with mismatched file signatures and extensions.
Evidence
The forensic image required for this lab (D_R_Case) can be obtained in one of the following ways:
- Recommended: Access via the CyberLab shared folder.
- Download using this link (this may take some time, depending on your connection).
- Also you here is the metadata for the image, hash etc, you access them from here.
- For Grep tool, you may use this cheatsheet (available on Moodle)
- OR you can use this online tool
- Also GenAI is great tool(s) to build reguler expression for GREP but make sure you test them first.
Part1: Creating a New Case in Autopsy
In this lab, you will use Autopsy to search for keywords and analyse file signatures.
You do not need to explore all Autopsy features. Focus on creating a case and ensuring the Disk Image data source is selected.
Task 1
Launch Autopsy from the Start menu.
In the Welcome window, click New Case.
Task 2
In the New Case Information window:
- Enter a Case Name:
Searching and Bookmarking - Choose a suitable Base Directory where the case data will be stored. Click Next.
Task 3
Confirm the case location and click Next.
Task 4
When the Add Data Source window appears:
- Under Select Type of Data Source to Add, ensure Disk Image is selected.
- Click Next.
Task 5
In the Select Data Source screen:
- Click Browse and select the provided forensic image (D_R_Case).
- Click Open.
Task 6
Leave the time zone set to the default for this lab.
Note: In real investigations, the time zone must match the location of the original system. This will be discussed later in the module.
Click Next.
Task 7
Accept the default ingest modules and click Finish to begin analysis.
The analysis may take some time. Monitor progress using the status bar in the lower-right corner.
Task 8
While the analysis is running, answer the following:
-
What is the size of the image?
________________________ -
What is the time zone of the image?
________________________
Part 2: Keyword Searching and Investigation in Autopsy
Task 9: Using Built-in Keyword Lists
- Click Keyword Lists (upper-right corner).
- Select the Email keyword list.
- Click Search.
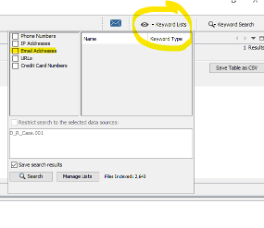
Question:
- How many email address hits are returned?
________________________
Task 10: Understanding Built-in Expressions
Autopsy provides built-in keyword expressions (e.g. email addresses, IP addresses, URLs).
These are useful but may generate a large number of results in complex cases.

Task 11: Manual Keyword Searching
Click Keyword Search.
(a) Substring Match
- Enter the keyword Cash.
- Select Substring Match.
- Click Search.
Question:
- How many hits are returned?
________________________
(b) Exact Match
- Search again using Exact Match for the word cash.
Question:
- How many hits are returned?
________________________
(c) Reflection
- What is the difference between substring and exact match searches?
- What do you understand from the results?
__________________________________________________
Task 12: Case 1 – Financial Investigation
You are investigating the financial information of an employee: Raj Hamilton.
Suggested keywords:
Raj, Hamilton, money, payroll, budget
(a) Searching for Raj
- Perform an exact match search for Raj.
Questions:
- What results did you find?
________________________ - Any indication of Raj’s financial information?
________________________
(b) Payroll and Money
- Search using money or payroll.
Questions:
- What results did you find?
________________________ - Any indication of Raj’s financial information?
________________________ - Can results from the Raj search help link payroll information?
________________________
(c) Financial Summary
Based on your findings, complete the following:
- Raj’s first quarter gross pay:
____________ - Raj’s second quarter rate of pay:
____________ - Raj’s annual total pay:
____________ - Total hours worked:
____________
Task 13: Case 2 – Data Breach Investigation
A data breach has occurred. The leaked data was published online using:
- Username: Chri1981
- Avatar: raven
Questions
- What keywords would you search for?
________________________ - Can you shortlist potential names?
________________________
Further investigation:
- Search for 1981 and review the results.
- Look for links to raven.
- Investigate file 15.txt if needed.
- Use any discovered name to perform further searches.
Final Questions:
- Who is the staff member that leaked the data?
________________________ - What evidence confirms their involvement?
________________________
Task 14: Case 3 – Industrial Espionage
You are investigating the leak of future car designs.
Background:
- Two staff members work in the research team.
- A USB device was found on one suspect’s desk.
- One suspect recently travelled to New York and Los Angeles.
Questions
- What keywords would you use?
________________________ - What evidence links the suspect to the data leak?
________________________ - Who shared the designs?
________________________ - Who received the designs, and who do they work for?
________________________
Part 3: Verifying the Forensic Image
After completing your analysis, verify the integrity of the image using SHA-256.
Method 1: Windows PowerShell
- Navigate to the folder containing the image.
- Hold Shift, right-click, and select Open PowerShell window here.
- Run:
Get-FileHash .\D_R_Case.001
- Record the SHA-256 hash.
Method 2: HashCalc
- Install HashCalc, you can download from here or from the lab folder on Moodle and CyberLab.
- Select the image file.
- Choose SHA-256.
- Calculate the hash.
Verification
- Locate the provided metadata file:
D_R_Case_info.txt, can download from here too. - Find the original SHA-256 hash value.
Question:
- Do all hash values match?
If not, explain what this indicates.
__________________________________________________
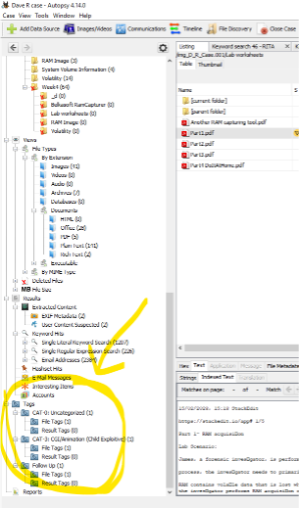
Part 3: Bookmarking the Evidence
Bookmarking allows you to create references to files or artefacts so they can be easily found later.
Tags can also be used by the central repository to mark items as notable.
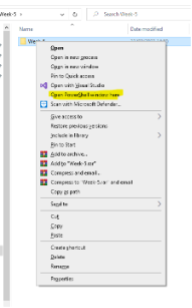
Task 15: Tagging Items
When you identify an item of interest:
- Right-click the file or result.
- Select one of the tagging options.
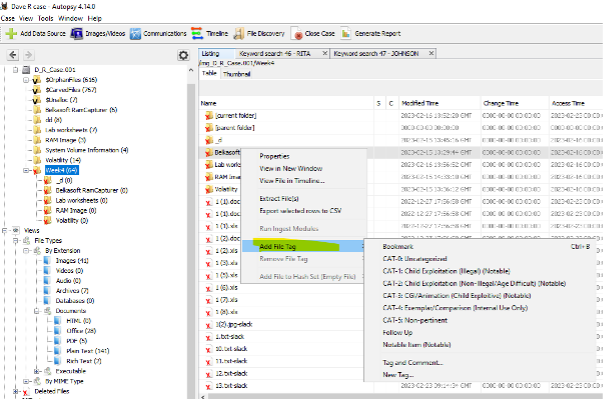
You can choose from:
- Use existing tag: Apply a tag without adding a comment.
- Tag and Comment: Apply a tag and add an explanatory note.
- New Tag: Create a new tag and apply it to the item.
Default Tag Types
Autopsy provides several built-in tags:
- Bookmark: Default tag for marking items of interest.
- CAT-1 to CAT-5: Law enforcement categorisation tags.
- Follow Up: Items requiring further investigation.
- Notable Item: Marks items as notable in the central repository.
You may also create custom tags.
Custom tags are saved automatically and appear above the default tags for future use.
Tip: To quickly apply the default Bookmark tag, use the keyboard shortcut Ctrl + B.
Tagging Multiple Items
- Select multiple items in the Blackboard.
- Right-click and apply the appropriate tag.
- An item can have more than one tag.
Tagged items:
-
Appear under Results → Tags in the tree.
-
Are highlighted in the Results Viewer.
Task 16: Managing Tags
-
Open Options → Tags to manage tag names.
-
From here, you can:
- Add new tags
- Edit existing tags
- Delete user-created tags
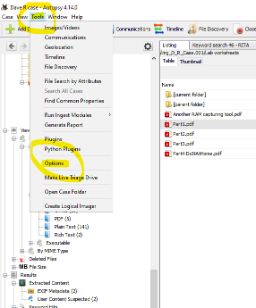

Note: Deleting a tag does not remove it from items already tagged.
The tag remains associated with those items in the case.
Task 17(Optional): Practical Bookmarking Exercise
- Return to Part 1, Task 12 (Case 1).
- Repeat the investigation.
- Bookmark each key finding as you progress.
Goal:
Use bookmarks to efficiently navigate between related findings throughout the investigation.